The Smart Thermostat C Wire Explained - What If You Don't Have One?
AUTHOR: Carlos ParasUPDATED: January 5, 2026
The smart thermostat has captured the attention of many homeowners with its ability to automate a home’s heating and cooling system. Not to mention its ability to connect to a Wi-Fi network which allows control of the thermostat from an app on a smartphone or computer device.
In addition to its convenience and energy saving features, another reason for the smart thermostat’s popularity is its ease of installation. You don’t have to be extremely handy or technically savvy to add this piece of modern-day technology to your home.
But before heading straight into the installation of a smart thermostat, it’s important to become familiar with the thermostat’s wiring. Most importantly, the C wire.
Many smart thermostats require a C wire to power the display screen, wireless connection, and internal processor.
It’s this article, I’ll explain what a C wire is, how it works, and how to know if you have one. We’ll also go over the options available if you don’t have a C wire and want to install a new smart thermostat.
Smart Home Deals @ AmazonWhat Is a C Wire?
The C wire, a.k.a. the "common wire", allows a constant flow of 24 VAC (volts AC) power to a smart thermostat. However, the C wire doesn’t provide the actual source of power to the thermostat.
The wires that provide the source of power are the R wires (or hot wires). They are labeled Rh (for heating), Rc (for cooling), or Rh/c (for both heating and cooling). Some thermostats simply have one wire labeled R.
The power from the R wire isn’t continuous and that is where the C wire comes in.
The C wire completes the circuit from the R wire back to the HVAC system’s control board. This is what provides the continuous flow of power which keeps the smart thermostat’s display and Wi-Fi capabilities running 24/7.
What Color Is a C-wire?
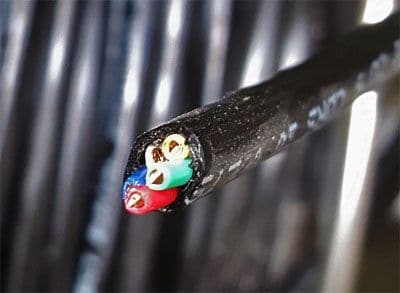
The C wire’s color isn’t standardized, so its color can’t be guaranteed across all HVAC systems. It is most often either blue or black, unless the installer did their own rewiring to create a C wire.
These are the most common colors and the labels used for thermostat wires:
- Blue or Black – C – The common wire
- Red – R – 24 VAC power from the transformer in your furnace
- Red – Rc – 24 VAC provides power to Cooling
- Red – Rh – 24 VAC provides power to Heating
- Green – G – Fan
- White – W – Heat
- Yellow – Y – Air Conditioner
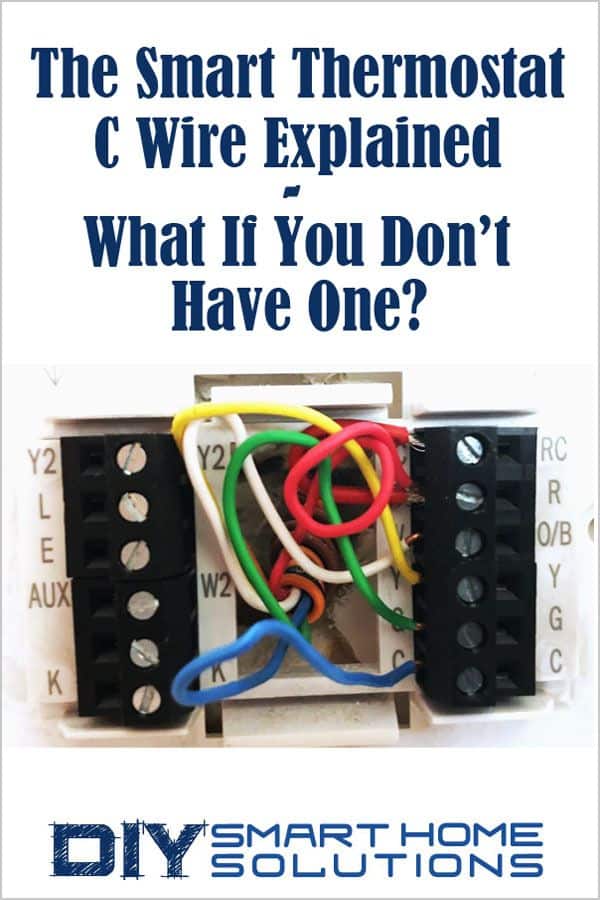
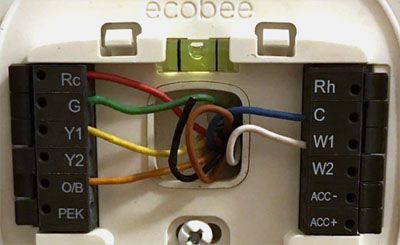
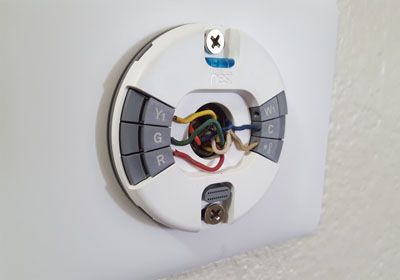
How Do I know If I Have a C wire?
Checking the labels for the wiring in your thermostat is the easiest way to figure out if you have a C wire. If you open up your thermostat, you will see some wires connected to labeled terminals inside.
One of the terminals will be labeled C and if there is a wire connected to that terminal, then you know you have a C wire.
If you don't happen to see a C wire connected to the C terminal, there is still a chance that you have a C wire installed.
Sometimes, if a C wire isn’t needed on the thermostat, the installer will run a C wire from the HVAC control board anyway and leave it disconnected behind the thermostat. Head down to your HVAC control board and see if there is a wire attached to the C terminal there.
If there is a wire connected to the C terminal at the HVAC control board:
- Note its color
- Check if there are any wires tucked behind the back of the thermostat with the same color
- If there is a matching wire, that should be your C wire.
If there is no wire connected to the C terminal at the HVAC board, you most likely do not have one.
A C wire isn’t necessary for all heating and cooling systems or thermostats. If you have an older heating and cooling system, there really isn’t a need for a C wire.
Not having a C wire doesn't mean that you can't install a new smart thermostat in your home. There are several options available if you don’t have a C wire and still want to take advantage of a smart thermostat.
What If I Don’t Have a C Wire?
Caution: The following options require working with the wiring from your HVAC system. Although thermostats use low voltage power, you should turn off the power to your HVAC system before connecting or running any wiring.
If you've never worked with wiring before, I highly suggest hiring a pro to do this. But, if you’re experienced with wiring and want to do it yourself, the process really isn’t too difficult or complicated.
Here is a list of options and step by step instructions to follow if you don't have a C wire:
Option 1: Add a C Wire to Your Furnace
If your furnace and new thermostat have a C terminal, you can simply run a new wire between your furnace and thermostat.
- Turn off the power to the furnace and thermostat at the circuit breaker.
- Make sure the power is off by trying to turn the thermostat on.
- Remove the access panel from the furnace and locate the thermostat wires and terminals.
- Connect an 18 AWG wire to the C terminal at the furnace.
- Next, remove the thermostat face plate.
- Now, run the new C wire from the furnace to the back of the new thermostat. This may take a little work depending on how far the new thermostat is from the furnace.
- Connect the wire to the C terminal at the thermostat.
- Put the thermostat face plate back on.
- Put the access panel back on the furnace.
- Turn the power for the furnace and thermostat back on at the circuit breaker.
Option 2: Run New Thermostat Cable
An alternative to Option 1 is to run completely new 18/5 wire from your furnace to your new thermostat. You’ll need to already have a C terminal on your HVAC control board for this option to work.
18/5 wire is simply a bundle of five colored, 18 AWG wires. If you only have a heating system with no AC, you can use 18/3 wire. But, if you’re going to do the work of running new wire, might as well use 18/5 in case you install AC in the future.
Running new 18/5 wire might be a little easier than Option 1 since you can use the old wiring to pull the new wires through the wall and to the back of the thermostat (see step 6 below).
- Turn off the power to the furnace and thermostat at the circuit breaker.
- Make sure the power is off by trying to turn the thermostat on.
- Remove the access panel from the furnace and locate the thermostat wires and terminals.
- Disconnect the old wires and connect the new wires to the appropriate terminals on the HVAC control panel. You can use the color and label chart we provided at the beginning of the article.
- Next, remove the thermostat face plate.
- Now, run the wires from the HVAC control board to the thermostat.
An easy way to run the new 18/5 wire to the thermostat is to securely connect the new wire to the old, then use the old wire to pull the new wire along the same route to the back of the thermostat. - Attach the new wires to the appropriate terminals on the thermostat.
- Put the thermostat face plate back on.
- Put the access panel back on the furnace.
- Turn the power for the furnace and thermostat back on at the circuit breaker.
Option 3: Use the existing G wire for the C wire:
This is probably the easiest and least expensive method to add a C wire to your system. You should only use this method if:
- The thermostat is wired directly to the furnace and not to a zone panel
- There is no other equipment wired to the fan such as a purifier, humidifier, or any other indoor air quality (IAQ) equipment
- The thermostat only runs the fan in cooling mode and doesn’t need the fan for heating
If the conditions listed above are met, you can proceed with this option. If not, you will have to try a different method.
It is important to note, with this option, you will lose the ability to manually control the fan. However, it will still operate normally with the thermostat in the Auto position.
- Turn off the power to the furnace and thermostat at the circuit breaker.
- Make sure the power is off by trying to turn the thermostat on.
- Remove the access panel from the furnace and locate the thermostat wires and terminals.
- Disconnect the G wire from its terminal on the HVAC control board.
- Connect the G wire to the C terminal on the HVAC control board.
- Add a jumper wire to connect the Y and G terminals.
- Remove the thermostat face plate and disconnect the G wire from its terminal.
- Connect the G wire to the C terminal on the thermostat.
- Put the thermostat face plate back on.
- Put the access panel back on the furnace.
- Turn the power for the furnace and thermostat back on at the circuit breaker.
Option 4: Use a C Wire Adapter Kit
No products found.
C wire adapter kits can allow an existing 4-wire system to work with a thermostat that requires a C wire. In order to use an adapter kit, there must be a minimum of four wires currently present on your thermostat and HVAC system.
There are many C wire adapter kits available on Amazon. These kits are simple to install and connect to your smart thermostat.
To connect the C wire adapter to thermostat:
- Turn off the power to the thermostat at the circuit breaker.
- Make sure the power is off by trying to turn the thermostat on.
- Remove the thermostat face plate.
- Insert one wire from the 24v adapter into the C terminal, then insert the other wire into the RC terminal.
- If your HVAC system has a cooling system, you will need to use a jumper wire to connect the RH terminal to the RC terminal.
- Put the thermostat face plate back on.
- Plug the 24v adapter into a power outlet and restore power at the circuit breaker.
Option 5: Purchase a Smart Thermostat with a Power Extender Kit
No products found.
Smart thermostats like the No products found. (link to Amazon) come with a Power Extender Kit (PEK) in the package. The PEK allows the smart thermostat to be used without a C wire.
The PEK will only work with HVAC systems that have:- 4 wires - W/W1, Y/Y1, G, and R (or RC or RH)
-
OR
- 3 wires - Y/Y1, G, and R (or RC or RH).
To install the PEK:
- Turn off the power to the furnace and thermostat at the circuit breaker.
- Make sure the power is off by trying to turn the thermostat on.
- Remove the access panel from the furnace and locate the thermostat wires and terminals.
- Disconnect and label the R, Y, G, and W wires from the HVAC control board.
- Connect the R, Y, G, and W to the corresponding terminals on the PEK.
- Connect the 5 labeled wires coming out of the PEK to the corresponding terminals on the HVAC control board.
- Mount the PEK to the inside of the furnace.
- Put the access panel back on the furnace.
- Remove the face plate from the old thermostat.
- Disconnect and label the wires from the old thermostat.
- Remove the old thermostat mounting plate.
- Install the new thermostat mounting plate.
- Connect the thermostat wires to the corresponding terminals on the new thermostat.
- Put the face plate on the new thermostat.
- Turn the power for the furnace and thermostat back on at the circuit breaker.
Option 6: Purchase a Power Stealing Thermostat
The most obvious solution to not having a C wire is to use a smart thermostat system that doesn’t require one. Most smart thermostats that don’t require a C wire use a process called power stealing.
What is a power stealing thermostat? A power stealing thermostat "steals" power from the circuits used to activate or deactivate the heating and cooling functions of the HVAC system.
When the thermostat is off or inactive, it draws a small amount of current from the unused circuits. Some power stealing thermostats are designed to draw this extra power even while the HVAC system is running.
The stolen current is used to power thermostat functions such as staying connected to Wi-Fi, powering the display, and recharging a battery or capacitor. The thermostat must draw just enough power to complete these functions.
If too much power is drawn, it may cause an inactive thermostat to switch on. If not enough power is drawn, it may cause the thermostat to shut down or the battery to run out of power.
The difficulty in determining the correct amount power to draw is one of the main reasons power stealing thermostats often operate erratically. In addition, using the circuits in this manner may cause the thermostat to break down after a few months of service.
There are plenty of negative reviews and experiences from people all over the internet complaining about the performance of their power stealing thermostat. I would recommend steering away from this option and sticking to one of the other methods listed above.
Recommended Products
No products found.
No products found.
No products found.
No products found.
No products found.
No products found.
No products found.
No products found.
No products found.
No products found.
No products found.
No products found.
No products found.
No products found.
No products found.
No products found.
No products found.
No products found.
No products found.
No products found.
No products found.
No products found.
No products found.
No products found.
No products found.
No products found.
No products found.
No products found.
No products found.
No products found.
About the Author